How to Choose the Right Noise Reduction Strength
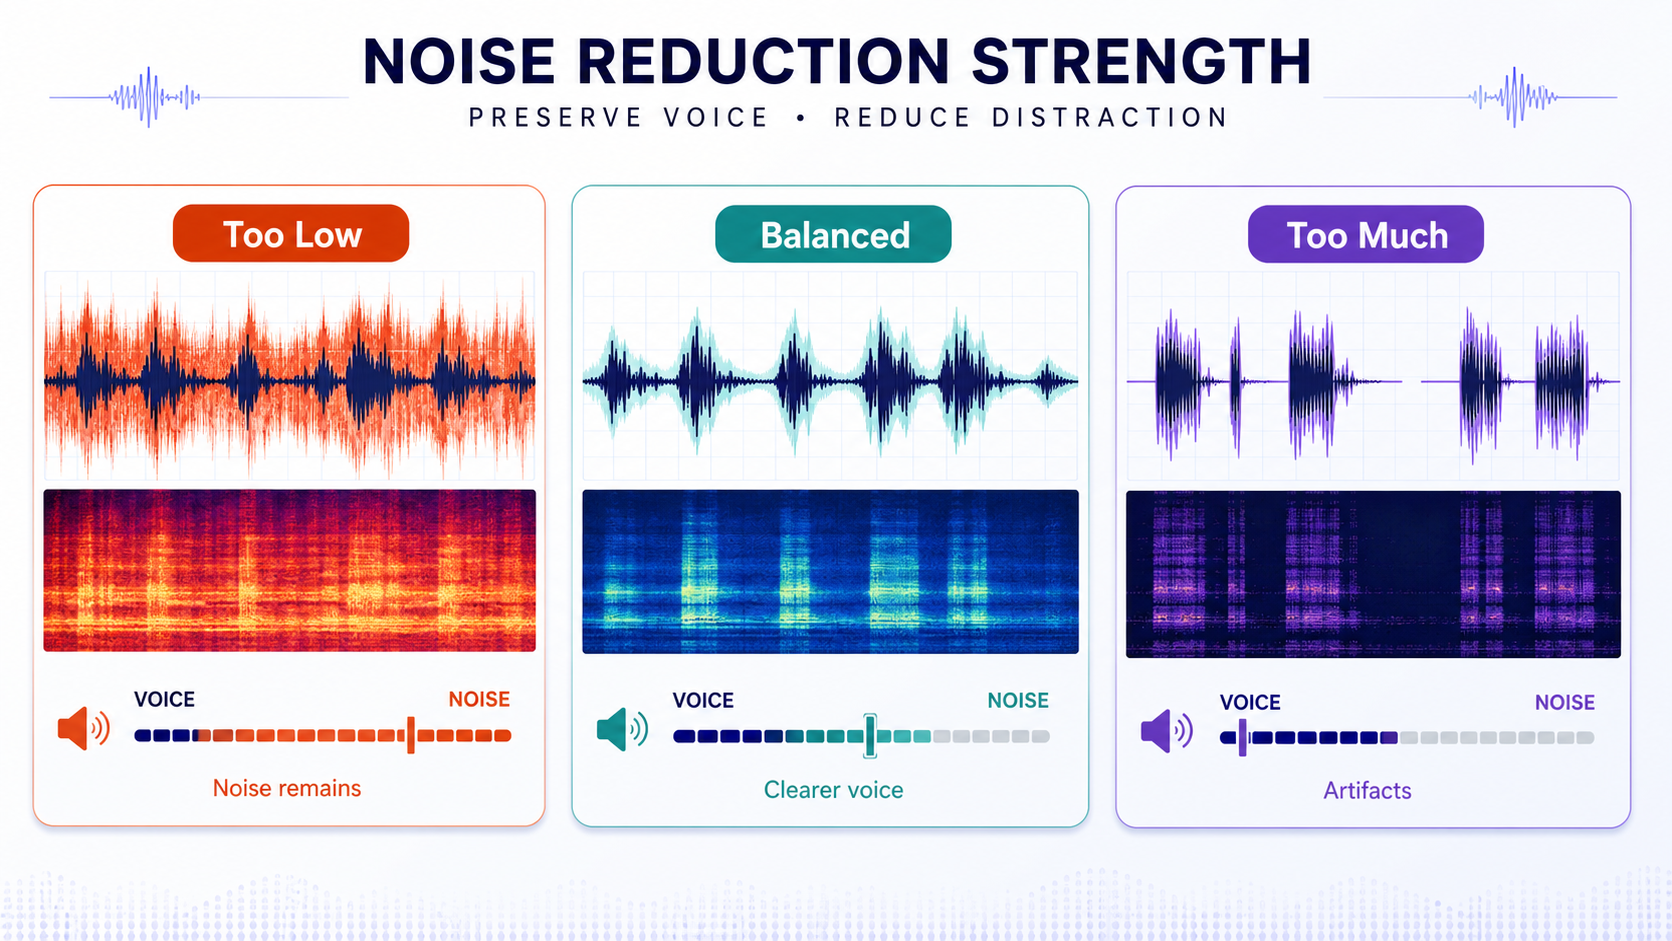
The right noise reduction strength is the lowest setting that makes the voice easier to understand. It is not the setting that makes the background perfectly silent. If the voice becomes thin, watery, gated, metallic, or robotic, the cleanup is too strong for that recording.
This is one of the most important ideas in audio cleanup. Noise reduction is a tradeoff. You are asking the tool to reduce unwanted sound while preserving speech detail. If the noise overlaps the same frequencies and timing as the voice, stronger processing may remove part of the voice too. CleanAudio's AI noise remover is built around previewing the cleaned result before download because the listening test matters more than the slider position.
If you want the terminology first, read noise removal vs noise reduction. If your file already sounds thin, watery, or artificial after cleanup, the companion guide is why noise removal can make voice sound robotic.
The Practical Rule
Use this rule first:
- Start lighter than you think.
- Preview the noisiest spoken line.
- Increase strength only if the voice still feels buried.
- Stop when speech is clear enough.
- Back off if the voice starts sounding processed.
Audacity's manual describes a similar tradeoff in practical terms: higher noise reduction values can reduce noise more, but can also make the remaining audio sound more damaged; sensitivity and smoothing settings can also affect how much of the signal is treated as noise [1].
Three Strength Zones
| Strength zone | What you hear | What it means |
|---|---|---|
| Too low | Noise remains distracting | Increase gently or use a better cleanup path |
| Balanced | Voice is clearer and still natural | This is usually the best result |
| Too high | Voice sounds dull, watery, robotic, or gated | Back off or try a different workflow |
Most people stop too late. They keep pushing until the background sounds almost gone. The better stopping point is earlier: when the listener can follow the speech without fatigue.
Why More Reduction Can Hurt Voice
Voice and noise are not always separate. A low fan may sit mostly behind the voice. Cafe chatter, keyboard taps, and room echo can overlap speech. Background music can overlap even more. When overlap increases, a heavy cleanup pass has less clean information to work with.
| Noise relationship | Example | Strength guidance |
|---|---|---|
| Mostly behind voice | Light fan, soft HVAC | Moderate cleanup can work well |
| Partly overlapping | Traffic, cafe chatter | Use moderate cleanup and preview carefully |
| Reflected voice | Echo, reverb | Use echo-aware cleanup, not only noise reduction |
| Short events | Clicks, bumps, taps | Repair or edit if isolated |
| Damaged capture | Clipped speech | Retake when possible |
| Music under voice | Song bed, loud intro | Treat as separation/mixing problem |
Adobe Audition's restoration tools and Audacity's noise reduction workflow both reflect the same general reality: different noise types need different treatment, and overly broad processing can affect wanted audio [1][2].
Choose Strength by Noise Behavior
The best setting depends less on the tool and more on how the unwanted sound behaves.
| Noise behavior | Example | Strength approach |
|---|---|---|
| Stable and below speech | Fan, HVAC, room bed | Moderate reduction can work well |
| Stable but tonal | Hum, buzz | Use a targeted hum workflow if available |
| Moving and changing | Traffic, cafe, street sound | Use lighter cleanup and preview worst lines |
| Speech-like | Chatter, nearby voices | Be conservative; voice overlap is high |
| Reflected speech | Echo, reverb | Use echo cleanup, not only noise reduction |
| Broken capture | Clipping | Do not solve with more strength |
This is why one universal strength setting is a myth. A file with steady fan noise may tolerate more reduction than a cafe recording. A room echo problem may get worse if you treat it like hiss. A clipped file may sound harsh no matter where the slider sits.
A Manual Strength Workflow
If you use a manual noise reduction workflow, do not start by guessing a final number. Start by identifying the kind of noise.
For a steady layer, find a short section where only the noise is present, capture or learn the noise profile if the tool requires it, then apply a light pass. Listen to consonants: S, T, K, F, and P. If those become smeared, the setting is too aggressive.
For changing noise, do not expect one fixed setting to solve everything. A passing car, cafe voice, or chair scrape may need a local edit, a lighter cleanup pass, or acceptance that the recording has limits.
For echo, treat strength carefully. Echo is reflected speech. If you push a broad noise reducer against echo, you may reduce room tone without fixing the hollow voice.
For clipped audio, do not keep increasing strength. Clipping means peaks were damaged during capture. Cleanup may make the background quieter, but it cannot reliably reconstruct missing speech detail.
A CleanAudio Workflow
If you want fewer manual decisions, use a preview-first workflow:
- Upload the file.
- Let the hybrid model analyze the recording.
- Preview the cleaned section.
- Listen for both clarity and naturalness.
- Download only if the result is easier to understand.
The advantage is not that the user no longer needs ears. The advantage is that the product handles more of the routing: which parts sound like steady noise, which parts sound more complex, and how much cleanup is likely to help without forcing the user to build a manual effects chain.
What to Listen For
Listen to the worst line first. That is the line where the speaker is quiet, the background is loud, or the room is most reflective.
Then check three things:
| Check | Good sign | Bad sign |
|---|---|---|
| Words | Easier to understand | Still masked or less clear |
| Texture | Voice sounds like the same person | Watery, metallic, thin, robotic |
| Background | Less distracting | Pumping, gating, or sudden dropouts |
If the voice is still natural but the background is not perfectly silent, that may be the right result. Clean speech is usually more valuable than sterile silence.
Common Mistakes
| Mistake | Why it hurts | Better move |
|---|---|---|
| Chasing silence | Silence can require damaging the voice | Aim for intelligibility |
| Checking only loud sentences | Loud speech hides artifacts | Check quiet words |
| Repeating heavy passes | Artifacts can compound | Use one careful pass |
| Treating echo as noise | Echo is reflected voice | Use echo cleanup |
| Ignoring the original | You lose comparison | A/B against raw audio |
A/B Testing Without Overthinking It
Use a simple A/B test. Play the original for five seconds, then the cleaned version for five seconds, then switch back. Do this on the worst spoken phrase. If the cleaned version makes the words easier to follow and the speaker still sounds like the same person, keep it. If the cleaned version only sounds quieter but less human, lower the strength.
Do not loop the same sentence for ten minutes. Your ear adapts. Make a decision, export a short test, and listen once more after a short break. Fresh ears catch overprocessing faster than another tiny slider adjustment.
If every strength setting sounds wrong, the issue may be bigger than the slider. Use why background noise removal fails to check for clipping, far-mic capture, overlapping speech, or music under the voice.
FAQ
What noise reduction strength should I use?
Use the lowest strength that makes the voice easier to understand. The exact number depends on the recording, noise type, and how much the noise overlaps speech.
Why does noise reduction make my voice sound robotic?
It usually means the cleanup is cutting into speech detail or creating gating artifacts. Reduce strength, use a more specific workflow, or accept that the recording needs a retake.
Is more noise reduction always better?
No. Stronger reduction can make the background quieter but the voice worse. The best result is clearer speech, not mathematical silence.
Sources and Further Reading
- Audacity Manual - Noise Reduction: https://manual.audacityteam.org/man/noise_reduction.html
- Adobe Audition - Noise reduction and restoration effects: https://helpx.adobe.com/audition/desktop/effects-reference/noise-reduction-restoration-effects.html
- DPA Microphones - How to improve speech intelligibility when amplifying the voice: https://www.dpamicrophones.com/mic-university/audio-production/how-to-improve-speech-intelligibility-when-amplifying-the-voice/