How to Remove Traffic Noise from Video
To remove traffic noise from video, start by identifying whether the noise is a steady road bed, passing vehicles, sirens, wind mixed with traffic, or low-frequency rumble from the street. A light cleanup pass can reduce the distraction when the speaker is still clear. If traffic is louder than the speaker or covers important words, cleanup can improve the file but may not fully recover the dialogue.
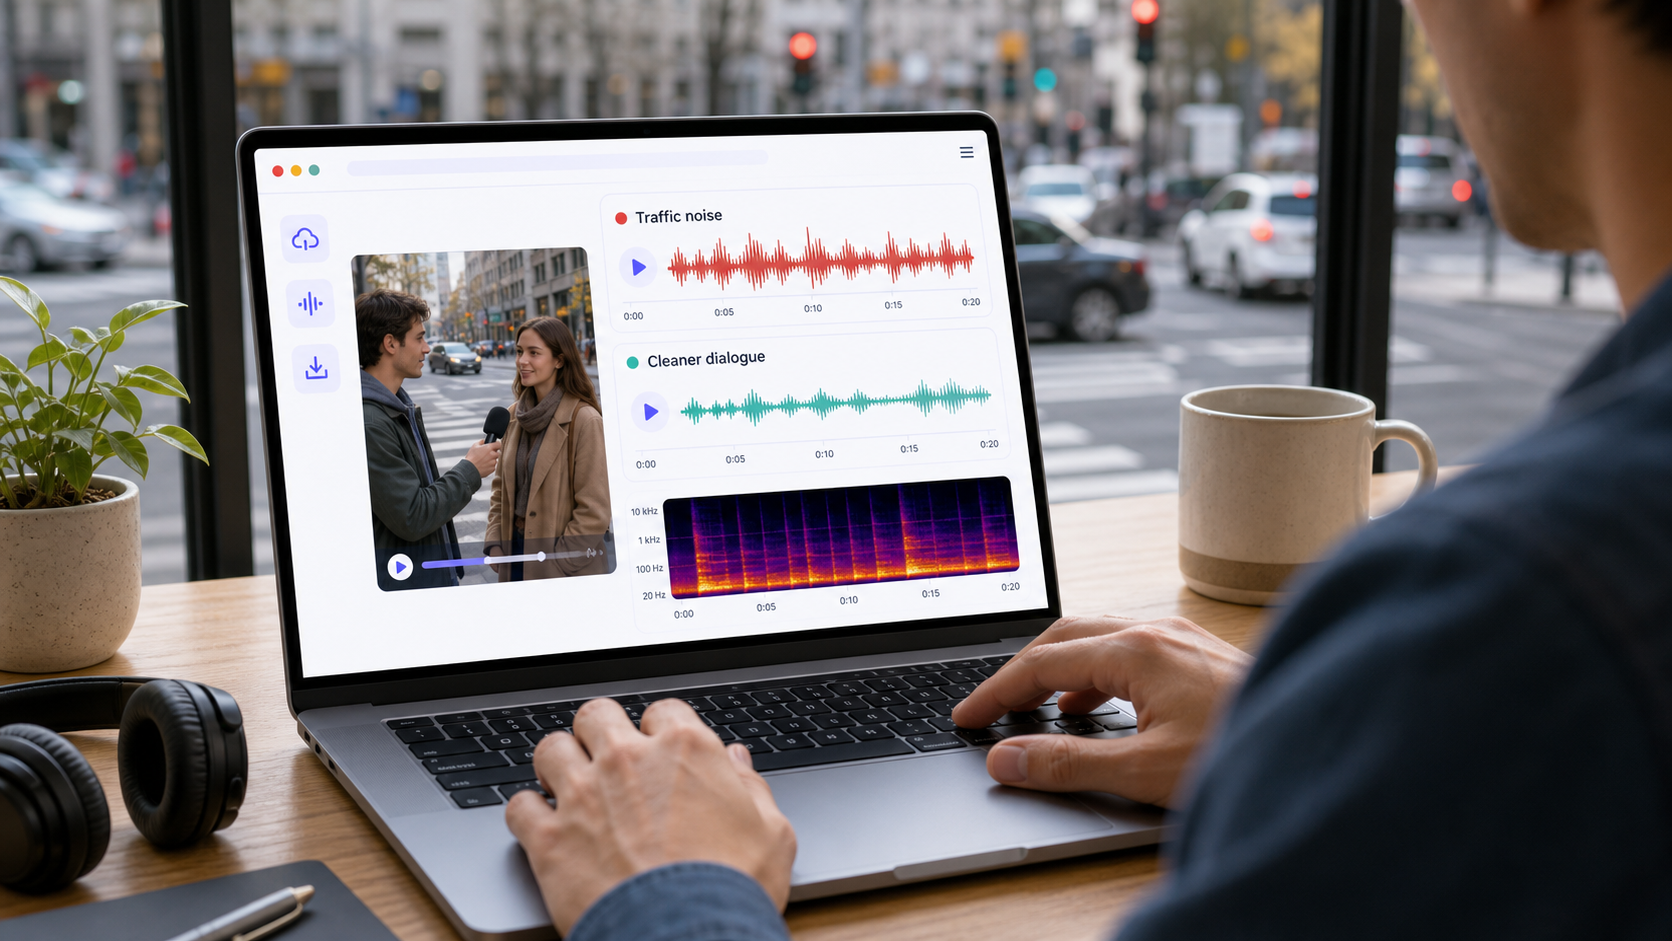
If you need to clean a file now, use CleanAudio's video noise remover. Upload the video, let the hybrid model analyze the audio track, preview the cleaned result, and download if the voice sounds clearer and natural. For audio-only recordings, use the audio noise remover. For broader context, start with background noise removal.
Traffic noise is common in street interviews, travel vlogs, outdoor tutorials, real estate walkthroughs, and phone videos recorded near roads. The mistake is treating all of it as one problem. Road rumble, a bus passing behind the speaker, and a siren crossing the sentence behave differently. A better workflow separates what can be reduced globally from what needs local repair, masking, or a retake.
Traffic Noise Is a Mix of Different Problems
Traffic is not one texture. It is usually a stack: low-frequency road rumble, midrange engine noise, broadband tire noise, short horn events, speech-like voices from bystanders, and sometimes wind from the same outdoor environment. The more that stack overlaps the speaker, the more careful the cleanup needs to be.
| Traffic sound | What it usually means | Cleanup difficulty | Better first move |
|---|---|---|---|
| Constant road bed | steady road wash behind speech | moderate | light broadband cleanup |
| Low rumble | trucks, buses, road vibration, handling noise | often manageable | reduce low-frequency rumble first |
| Passing car | short moving burst | mixed | local edit if it hits a key phrase |
| Siren or horn | loud narrow event | hard | cut, repair, or retake if it covers words |
| Crowd plus traffic | speech-like background plus road noise | hard | keep cleanup conservative |
| Wind plus traffic | outdoor air movement plus road bed | hard | treat wind as a separate problem |
The practical rule is simple: stable traffic noise is easier than traffic events. A road bed behind a clear speaker can often be reduced. A horn directly over a word is a different problem because the unwanted sound and the wanted sound share the same moment.
A Quick Diagnosis Before Cleanup
Before choosing a tool, listen to three short sections. First, find a line where the speaker is clear and traffic is behind them. Second, find a moment with no speech but traffic only. Third, find the worst moment: a passing truck, horn, siren, or wind burst over speech. Those three moments tell you whether the file is cleanable, partly cleanable, or better re-recorded.
| What you hear | What it tells you | What to do |
|---|---|---|
| Voice is clear, traffic sits behind it | good cleanup candidate | try AI cleanup or light manual reduction |
| Voice is thin but understandable | possible, but watch artifacts | clean lightly and compare voice tone |
| Traffic is louder than the speaker | poor source balance | retake if possible |
| Siren covers a word | missing information problem | local repair may help, but do not expect perfect recovery |
| Wind and traffic both hit the mic | two different noise types | use a workflow that can handle mixed noise |
This is where source technique matters. Shure's recording guidance repeatedly comes back to microphone placement, distance, and isolation because the recording is shaped at the microphone before any software sees it [1]. DPA's speech-intelligibility guidance also emphasizes the relationship between the voice and surrounding noise [2]. If the speaker is close and clear, software has more useful signal to preserve.
If You Use a Manual Cleanup Workflow
Manual cleanup can work well when the traffic layer is steady and the video is short. It becomes tedious when the traffic changes every few seconds. Use the following order rather than throwing one heavy effect at the whole file.
- Duplicate the original audio track so you can compare against it.
- Lower or remove obvious non-speech gaps where traffic is loud but nobody is talking.
- Apply a gentle low-frequency cleanup only if the recording has road rumble or truck vibration.
- Use light broadband noise reduction for a steady road bed. Do not push until the background disappears.
- Repair isolated horns, taps, or vehicle bursts locally when they happen between words.
- Listen to the same sentence before and after cleanup.
- Stop when the voice starts to sound watery, gated, or thinner than the original.
If a tool asks for a noise sample, choose a section with traffic but no speech. Do not include the speaker's breath, consonants, or room reflections in the sample. If the sample contains voice, the reduction can learn the wrong target and damage the dialogue.
When CleanAudio Is the Faster Fit
CleanAudio is useful when the video has mixed outdoor noise: traffic bed, wind, small bursts, crowd sound, and changing distance from the microphone. A manual editor has to decide where one problem ends and the next begins. CleanAudio's productized workflow is designed to reduce that routing burden: upload the video, let the hybrid model analyze the audio track, preview the cleaned version, then download only if the speech sounds better.
That matters because many traffic recordings are not clean textbook examples. A street interview might start beside a road, move under a bridge, catch a scooter pass, and then hit a windy corner. Different moments may need different cleanup behavior. The value of a hybrid model is not that it promises silence. The value is that it can analyze changing segments and apply a more suitable noise-removal approach while keeping the preview step in front of the user.
Use CleanAudio first when:
- the file is long and manually checking every vehicle pass would take too much time
- the video has both traffic and wind
- you need to preserve sync between audio and video
- you want a preview before committing to the cleaned file
- the speaker remains understandable in the original recording
Use manual repair first when the problem is one isolated horn, one dropped object, or one short burst between words. Use a retake when the traffic covers the actual words.
How Different Video Tools Fit
Traditional video editors are strong when the audio cleanup is part of a larger edit. They let you cut, isolate, keyframe, and combine effects. The tradeoff is setup: you need to know what to reduce, how much to reduce it, and where to stop.
| Workflow | Strength | Weakness | Best use |
|---|---|---|---|
| Full video editor | precise control inside the timeline | more setup and listening | projects already being edited |
| Audio repair editor | detailed local repair | slower for casual creators | isolated events or difficult sections |
| AI cleanup workflow | fast routing and preview | cannot restore speech that was never captured | mixed but understandable outdoor footage |
| Retake | best audio quality | not always possible | critical lines covered by traffic |
Adobe's professional audio tools expose noise-reduction and restoration effects for detailed control [3]. Audacity's public guidance explains the idea of noise reduction and the risk of processing too aggressively [4]. Those workflows are valuable, but they still ask the user to make many decisions. For creators who mainly need a cleaner street interview, a browser-based workflow can be the more practical first pass.
Prevention Usually Beats Cleanup
If you can record again, reduce traffic before it reaches the microphone. Turn the speaker away from the road. Move closer to the mic. Step behind a wall, parked van, or building corner when safe. Record a short test and listen with headphones before doing the whole take. Avoid pointing the microphone at the traffic source if your mic pattern gives you any directionality to work with.
For phone videos, the biggest improvement is often distance. A phone held two meters away in a busy street gives cleanup a weak voice and a strong environment. A closer microphone gives the voice more separation before software does anything. That is why the same cleanup tool can work well on one street interview and struggle on another.
Practical Decision Framework
Use this rule before spending time on cleanup:
| File condition | Recommended path |
|---|---|
| Speaker clear, traffic behind | CleanAudio or light manual cleanup |
| Constant road rumble | low-frequency cleanup plus preview |
| Traffic changes every few seconds | CleanAudio first, manual fixes only for worst moments |
| Siren covers one word | local repair or retake |
| Speech is buried under traffic | retake if possible |
| Video sync matters | video-first cleanup workflow |
The goal is not mathematical silence. The goal is a viewer who can understand the speaker without noticing the street every few seconds. If the cleaned version feels clearer and still sounds like the same person in the same place, you have probably gone far enough.
FAQ
Can traffic noise be removed from video?
It can often be reduced when the speaker is still clear. Constant traffic behind speech is easier than a horn, siren, or passing truck that covers important words.
Can CleanAudio remove road noise from a street interview?
CleanAudio can help reduce distracting road noise when the voice is present and understandable. Upload the video, preview the cleaned result, and compare the speaker's tone before downloading.
Why does traffic noise sometimes stay after cleanup?
Traffic changes over time and often overlaps the same frequencies as speech. A cleanup tool can reduce distraction, but it cannot perfectly recover words that were masked by loud vehicles.
Should I clean traffic noise before or after editing the video?
Clean the audio before final music, compression, and export. If you still need to cut the video, keep the original file so you can compare and avoid stacking too many processes.
Sources and Further Reading
[1] Shure: Microphone Techniques for Recording
https://www.shure.com/damfiles/default/global/documents/publications/en/performance-production/microphone_techniques_for_recording_english.pdf-bb0469316afdb6118691d2f3f5e3ff01.pdf
[2] DPA Microphones: How to Improve Speech Intelligibility When Amplifying the Voice
https://www.dpamicrophones.com/mic-university/audio-production/how-to-improve-speech-intelligibility-when-amplifying-the-voice/
[3] Adobe Audition: Noise Reduction / Restoration effects
https://helpx.adobe.com/audition/desktop/effects-reference/noise-reduction-restoration-effects.html
[4] Audacity Support: Noise reduction and removal
https://support.audacityteam.org/repairing-audio/noise-reduction-removal