Audio vs Video Noise Removal: What Changes in the Workflow?
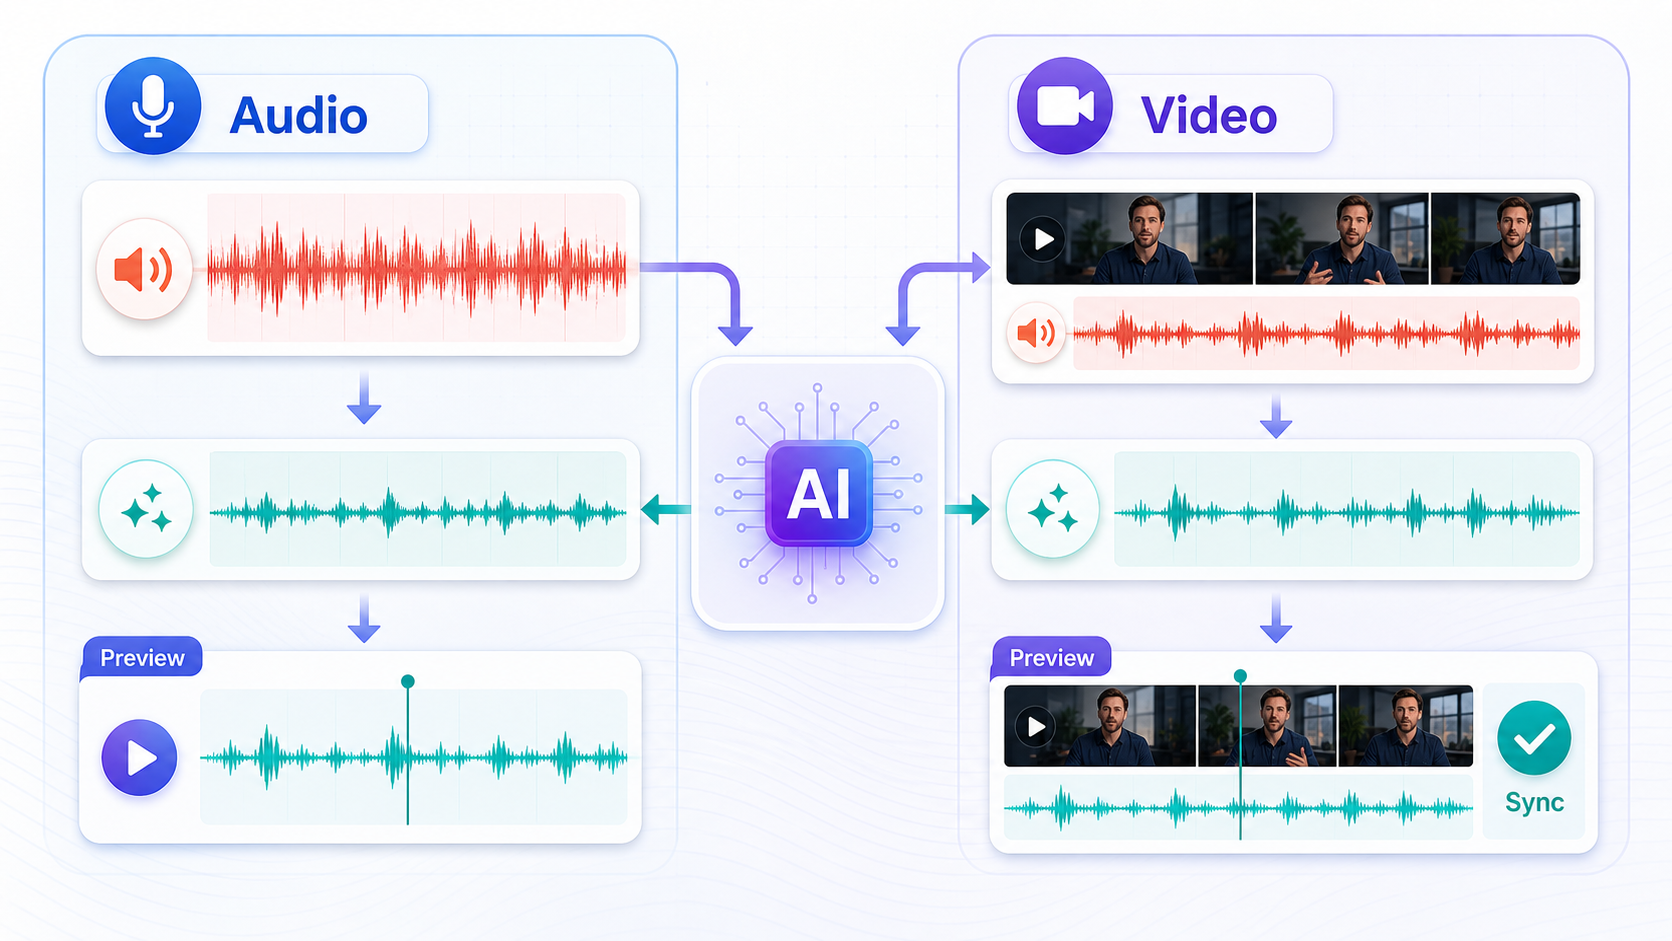
Audio noise removal and video noise removal solve the same core problem: unwanted sound makes speech harder to understand. The difference is the workflow. With an audio file, you only judge the sound. With a video file, you also have to preserve sync, avoid damaging the visual edit, and export the cleaned result in a format the video project can use.
If you only have a voice recording, start with CleanAudio's audio noise remover. If the noisy sound is inside a video, start with CleanAudio's video noise remover so the audio track can be cleaned while the video workflow stays intact.
The Core Difference
In both cases, the cleanup system needs to preserve the voice while reducing distraction. That part does not change. What changes is the container around the audio. If you need the broader search-intent overview before choosing a workflow, start with background noise removal.
| File type | Main question | Extra risk |
|---|---|---|
| Audio file | Is the voice clearer and still natural? | Overprocessing, dull voice, remaining noise |
| Video file | Is the voice clearer and still in sync with the picture? | Audio/video drift, wrong export format, timeline mismatch |
This is why a video cleanup workflow should never be judged only by the waveform. The viewer experiences speech, mouth movement, cuts, slides, subtitles, and music together.
Audio-Only Cleanup Workflow
Use this path for podcasts, voice memos, interviews, narration, webinars exported as audio, and meeting recordings.
- Upload the audio file.
- Preview the noisiest spoken section.
- Check whether words are easier to understand.
- Listen for unnatural texture: watery, metallic, gated, or thin voice.
- Download the cleaned file if it passes.
- Use the cleaned audio in your podcast editor, transcript workflow, course library, or archive.
Audio-only cleanup is simpler because there is no picture to maintain. You can trim silence, normalize levels, cut a cough, or replace a section without worrying about mouth movement or screen actions. For deeper audio-only planning, see remove background noise from audio online.
Video Cleanup Workflow
Use this path for vlogs, tutorials, screen recordings, webinars with video, interviews, phone videos, and social clips.
- Upload the video file.
- Let the cleanup workflow process the audio track.
- Preview the cleaned result.
- Check the noisiest spoken section.
- Check sync around visible speech, cursor movement, slide changes, or cuts.
- Download the cleaned video or cleaned audio workflow output.
- Bring the result into your editor only after the audio passes review.
Microsoft's Clipchamp support documentation shows why video often adds one more step: for embedded video audio, users may need to detach the audio before applying noise suppression in the editor [1]. That is not a sound-quality issue; it is a workflow issue. Video audio lives inside a timeline. The related creator workflow is video audio cleanup workflow.
What Changes by Noise Type
The noise itself does not care whether it is inside an MP3 or MP4. A fan is still a fan. Echo is still reflected speech. Wind is still physical mic buffeting. The difference is what the cleaned result must preserve.
| Noise type | Audio workflow | Video workflow |
|---|---|---|
| Fan or HVAC | Clean and preview voice texture | Clean and also check scene continuity |
| Room echo | Use echo-aware cleanup | Check whether lips still match the cleaned voice |
| Wind | Preview clipped or buffeted words | Check outdoor shots and speech moments together |
| Keyboard taps | Edit isolated hits if needed | Check taps against visible typing or screen actions |
| Traffic or cafe chatter | Preview worst phrase | Check cuts and background ambience changes |
| Clipping | Retake if possible | Retake or replace the visible line if possible |
Audacity's manual warns that stronger noise reduction can reduce noise while damaging the remaining audio, especially with loud or variable noise [2]. Video adds another reason to be conservative: if the voice sounds processed, the visual professionalism does not save the clip.
When to Use Audio Cleanup First
Use the audio workflow first when the asset's value is mostly speech. Examples: podcast episode, audio interview, recorded consultation, webinar audio export, voice memo, narration file, or transcript source.
This gives you a cleaner source before you make downstream decisions. If the audio is not usable, you know before transcription, editing, or publication.
When to Use Video Cleanup First
Use the video workflow first when the audio is tied to a visual performance. Examples: YouTube vlog, screen recording, phone video, video interview, course lesson, or product demo.
In these cases, sync is part of quality. A cleaned voice that drifts from the mouth, cursor, or slide timing is not really fixed.
Where CleanAudio Fits
CleanAudio's practical advantage is that it gives users two clear entry points instead of forcing every file through the same path.
| User has | Better starting point | Why |
|---|---|---|
| Voice memo or podcast track | Audio noise remover | Fastest path to judge speech |
| MP4 or MOV with noisy voice | Video noise remover | Keeps video workflow in mind |
| Webinar recording | Depends on export | Use audio if audio-only, video if replay video matters |
| Screen recording | Video noise remover | Sync with cursor and screen actions matters |
| Interview audio exported separately | Audio noise remover | No picture to preserve |
The productized workflow is the same in spirit: upload, let the hybrid model analyze the recording, preview the cleaned result, and download if the voice is clearer. The difference is what you check before accepting the result.
Decision Table: Which Workflow Should You Start With?
If the answer is not obvious, use the asset's final destination as the tiebreaker.
| Situation | Start with | Reason |
|---|---|---|
| Podcast episode, voice note, narration WAV/MP3 | Audio cleanup | No visual sync constraint |
| YouTube vlog, interview, course video | Video cleanup | Speech must stay tied to picture |
| Webinar exported as MP4 replay | Video cleanup | Slides, speaker view, and audio must align |
| Webinar exported as audio-only archive | Audio cleanup | Faster review and simpler file handling |
| Screen recording with cursor clicks | Video cleanup | Cursor, clicks, and speech timing are part of the viewer experience |
| Separate camera file and separate mic file | Clean the mic audio, then sync in editor | Keep the best source audio before final assembly |
This avoids a common mistake: extracting audio from every video just because the audio is noisy. Extraction can be useful in a manual editor, but it also creates a sync responsibility. If the end product is video, keep the video workflow unless you have a clear reason to split the tracks.
Final Review Before You Accept the File
For audio, the final review is mostly a listening test. Play the worst phrase, the quietest phrase, and a normal phrase. If all three are easier to understand and the speaker still sounds natural, the file is ready.
For video, add a visual pass. Watch the same cleaned section with the picture on. Check mouth movement, slide changes, cursor actions, captions, and cuts. If the sound is cleaner but the timing feels wrong, the viewer will notice even if the waveform looks better.
The practical standard is simple: audio cleanup should reduce listening effort; video cleanup should reduce listening effort without creating visual friction.
Common Mistakes
| Mistake | Why it hurts | Better move |
|---|---|---|
| Cleaning video as if it were only audio | Sync and timeline issues can be missed | Check visual timing |
| Exporting before previewing the worst phrase | The clean section may hide failure | Preview the noisiest line |
| Using heavy cleanup to chase silence | Voice can sound unnatural | Aim for intelligibility |
| Detaching audio and moving it accidentally | Dialogue can drift | Check sync after edits |
| Treating clipping as background noise | Missing speech detail cannot be restored reliably | Retake or replace if possible |
FAQ
Is video noise removal different from audio noise removal?
The sound problem is similar, but video adds sync and export constraints. You need the voice to be clearer and still match the picture.
Should I extract audio from video before cleaning it?
Only if your workflow requires it. If you use a dedicated video noise remover, start with the video file. If you are editing manually in a video editor, you may need to detach audio depending on the tool.
Which CleanAudio workflow should I use?
Use the audio workflow for standalone audio files. Use the video workflow when the noisy voice is part of a video and sync matters.
Sources and Further Reading
- Microsoft Support - How to use noise suppression in Clipchamp: https://support.microsoft.com/en-us/clipchamp/how-to-use-noise-suppression
- Audacity Manual - Noise Reduction: https://manual.audacityteam.org/man/noise_reduction.html
- Wondershare Filmora - AI Audio Denoise: https://filmora.wondershare.com/ai-audio-denoise.html