How to Remove Room Noise from a Recording
To remove room noise from a recording, do not start by looking for one magic noise-removal setting. First identify what the room is adding to the voice. It may be a steady fan or computer floor, a boxy reflection tail, random household sounds, or a distant microphone problem. Each one needs a different cleanup decision.
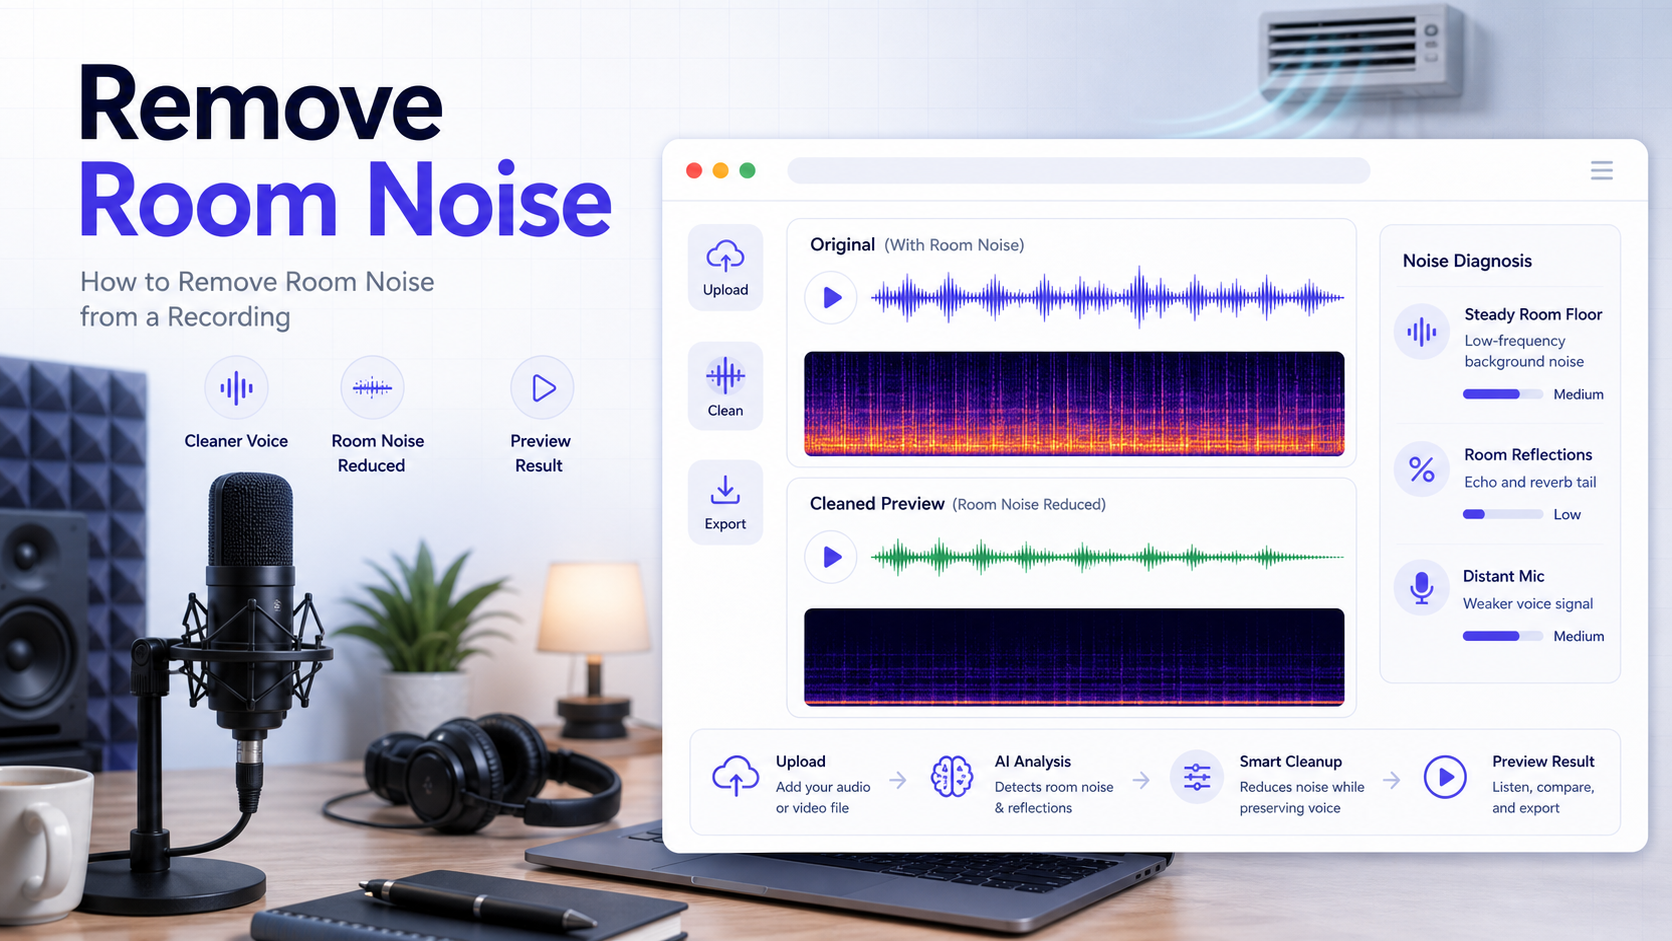
The fastest path is simple: diagnose the dominant problem, try the lightest cleanup that matches it, then judge the result during active speech. If the voice is still clear enough to preserve, CleanAudio's audio cleanup workflow can give you a quick before-and-after preview. If the recording is distant, clipped, or full of random interruptions, cleanup may still help, but it should not be treated as a guaranteed rescue.
For nearby context, see background noise removal, types of background noise in recordings, how to remove background noise from a microphone, and how to remove hiss from audio.
Room Noise Is Usually Three Different Problems
Most generic guides act as if room noise is one slider. In real voice recordings, it usually breaks into three categories.
1. Steady room floor
This is the continuous layer from air conditioning, a desktop fan, a computer, or a distant appliance. It behaves more like hiss. Audacity's manual is useful here because it clearly frames noise reduction as a fit for constant noise, not every kind of background sound [4].
2. Room reflections
These are the short bounces from hard walls, desks, glass, and empty rooms. They are not a separate machine noise. They are copies of the voice arriving later. DPA's acoustics guidance ties this directly to reverberation time and room behavior [3].
3. Distant-mic capture
This is the setup error that makes both of the first two problems worse. When the mic is too far away, you do not just capture more room. You also weaken the direct voice, which gives cleanup less clean speech to preserve. Shure's guidance keeps returning to this because close placement changes the direct-to-room ratio before you ever hit record [1][2].
The right workflow starts by deciding which of those three is doing the most damage.
Quick Diagnosis Before You Touch a Tool
Use this quick diagnosis before you run any cleanup. It keeps you from applying one heavy process to several different problems.
| What you hear | Likely problem | What usually helps | What to avoid |
|---|---|---|---|
| A constant hiss, fan, computer, or HVAC layer from start to finish | Steady room floor | Light noise-profile reduction or AI cleanup preview | Heavy denoise that makes speech brittle |
| Pauses bloom after the speaker stops; the room sounds boxy or hollow | Room reflections / reverb | Conservative de-reverb or a cleanup preview focused on intelligibility | Treating it like simple hiss |
| The voice sounds far away before cleanup starts | Distant-mic capture | Closer mic next time; light rescue cleanup only | Expecting software to create a close-mic sound |
| Keyboard taps, chair squeaks, traffic, or door sounds poke through | Irregular events | Local edits, retake, or selective repair | One global denoise pass across the whole file |
This is where many home-recording fixes go off track. People hear "noise" and push one process across a file that actually contains several different problems.
A Practical Cleanup Workflow
If you are using a manual cleanup workflow, make the first pass diagnostic, not aggressive. The goal is to find out what can be improved without damaging the voice.
Use this order:
- Keep the original file untouched. Duplicate the file or work on a copy so you can compare every decision against the raw capture.
- Listen once on headphones and once on speakers. Headphones reveal hiss and room tail; speakers reveal whether the voice still feels natural.
- Mark three moments: the worst steady-noise pause, the worst reflective sentence, and the clearest sentence. These become your test points.
- If the room floor is steady, use a light noise-profile style pass. Capture a short noise-only segment if one exists, apply mild reduction, then preview the clearest sentence before doing more [4][5].
- If room reflections are the bigger problem, use a light de-reverb style pass. Listen to consonants and phrase endings; stop if the voice becomes papery or hollow [5].
- If the issue is intermittent, edit locally. Cut or repair the specific tap, bump, or door sound instead of forcing one global setting over the whole file.
- Recheck active speech, not only silence. A pause can sound clean while the voice has already lost body.
That last point is the real success condition. Room cleanup is not a contest to make the background disappear. It is a judgment call about whether the listener can stay with the message.
When CleanAudio Is the Faster Fit
If you do not need a full editor decision tree and mainly need to know whether the file is publishable, a preview-first cleanup workflow is often faster.
CleanAudio is a good fit when:
- The voice is still intelligible.
- The room floor or room tail is distracting but not overwhelming.
- You want a quick before-and-after judgment before rebuilding the recording in a DAW.
Use it the same disciplined way you would judge a manual edit:
- Upload the original recording.
- Let CleanAudio generate the preview automatically.
- Compare the raw and cleaned versions during active speech, not only in pauses.
- Keep the cleaned result only if the words are clearer and the voice still sounds believable.
That is a better claim than "remove room noise completely." It matches what careful editors actually decide.
What Usually Works Best for Each Type
| Room-noise type | Manual cleanup fit | CleanAudio / automatic cleanup fit | Practical verdict |
|---|---|---|---|
| Steady HVAC or computer noise | Strong fit when you have a clean noise-only sample and time to tune the amount | Strong fit for a quick preview when the voice is clear | Best rescue case; use light reduction and stop before the voice turns brittle |
| Boxy room reflections | Moderate fit with conservative de-reverb and careful listening | Useful when you need a fast intelligibility check | Shorten the room impression; do not chase perfect dryness |
| Distant voice plus room wash | Weak fit if the direct voice is already buried | Useful only as a rescue check | Cleanup may help, but a close-mic retake is often better |
| Random household sounds | Better handled with local edits or retake | Mixed; global cleanup may miss short events | Do not force one global denoise pass across clicks, bumps, and traffic |
This is the reason a hybrid or automatic cleanup workflow can feel faster: it lets you test whether the file improves before you spend time building a manual chain. Manual work is still useful when the problem is highly specific, but it should follow the diagnosis instead of replacing it.
Why a Closer Mic Changes Everything
This is the least glamorous advice in the article and the most important.
Shure's recording and podcasting guidance both make the same operational point: keep the microphone close enough that the direct voice dominates, and use a directional pattern when the environment is noisy [1][2]. A closer mic does three things at once:
- The voice gets louder relative to the room.
- Reflections matter less.
- Cleanup has more intact speech to preserve.
That is why two recordings made in the same room can clean up very differently. The better one is often not the quieter room. It is the closer voice.
Common Mistakes
| Mistake | What happens | Better move |
|---|---|---|
| Treating room reflections like steady hiss | The room tail may shrink, but the voice can lose body because reflections overlap speech | Use conservative de-reverb or judge with a CleanAudio preview before pushing harder |
| Recording far from the mic and trying to fix it later | Cleanup has less direct voice to preserve, so the result stays distant or becomes filtered | Move the mic closer next time; treat the current file as a rescue, not a studio restoration |
| Using one aggressive denoise pass on mixed noise | Hiss may reduce, but clicks, traffic, or echo remain while the voice gets thinner | Separate steady noise, reflection, and irregular events before choosing a process |
| Judging the result only in pauses | Silence sounds cleaner, but active speech may sound papery or robotic | Compare full sentences, consonants, and phrase endings |
| Forgetting that some room is natural | Overprocessing can sound more distracting than a small amount of room tone | Stop when the message is easier to follow, not when the background is mathematically silent |
FAQ
Is room noise the same as echo?
Not always. Room noise can include steady fan noise, random household sounds, and reflections. Echo or reverb is the reflection part of the problem.
Can I remove room noise completely?
Sometimes you can reduce it a lot. Complete removal is much less realistic when the voice was recorded far from the mic or the room reflections are strong.
Does a gate fix room noise?
Only partially. A gate may hide noise in pauses, but it does not solve noise and reflections sitting under active speech.
What helps more than software?
Closer microphone placement, directional pickup, and less reflective surfaces usually help more than a stronger cleanup pass [1][2][3].
Sources and Further Reading
[1] Shure PDF: Microphone Techniques for Recording https://www.shure.com/damfiles/default/global/documents/publications/en/performance-production/microphone_techniques_for_recording_english.pdf-bb0469316afdb6118691d2f3f5e3ff01.pdf
[2] Shure: Choosing a Microphone for Podcasting https://www.shure.com/en-EU/insights/choosing-a-microphone-for-podcasting
[3] DPA Microphones: 10 important facts about acoustics for microphone users https://www.dpamicrophones.com/mic-university/background-knowledge/10-important-facts-about-acoustics-for-microphone-users/
[4] Audacity Manual: Noise Reduction https://manual.audacityteam.org/man/noise_reduction.html
[5] Adobe Audition Help: Reduce noise and restore audio https://helpx.adobe.com/audition/desktop/effects-reference/noise-reduction-restoration-effects.html